

Amazon smart thermostat is the first thermostat ever manufactured by Amazon.
Despite being extremely affordable, it is a durable piece of hardware that is powered by Resideo, the parent company of Honeywell Home, which itself is a popular thermostat brand.
Hence, I personally believe that there is no question regarding the reliability of the Amazon Smart Thermostat.
Now that you have bought the Amazon smart thermostat, you might be wondering how to install it. You can call a technician or you can simply install it yourself.
If the latter is your choice, this article will provide a step-by-step guide on How to Install Amazon Smart Thermostat.
Compatible or not?
The very first thing to check is whether the Amazon Smart Thermostat is compatible with your HVAC System or not.
The most important point here is that the Amazon Smart Thermostat is compatible with low-voltage systems (24V) and not with high-voltage systems (110V/220V).
You can check the compatibility by using Amazon’s compatibility checker.
Another important factor to consider is whether your home has a C-wire or not. If you do not have a C-wire, then you will need a c wire adapter to install the Amazon thermostat.
How to Install Amazon Smart Thermostat – A Step-by-Step Guide
Step 1: The very first thing you need to do is turn off your HVAC system’s breaker/fuse from your home’s electrical fuse box or your HVAC system’s control panel.
Step 2: Once this is done, your safety precautions are complete. You can move ahead and remove the faceplate of your old thermostat.
Step 3: This is going to expose all the wirings underneath. At this stage go ahead and take a picture of the wirings for future reference, or just in case you need to re-install your old thermostat.
Step 4: Now, you need to remove the wires from the old thermostat one by one using Pliers.
As you do so, label each of them with the colored stickers that came in the Amazon thermostat’s packaging.
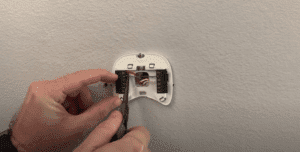
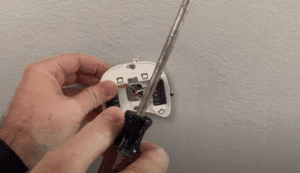
Step 5: Unscrew and remove the baseplate of your old thermostat.
Step 6: Take out the baseplate of the Amazon Smart thermostat from the box and pass all wires through it.
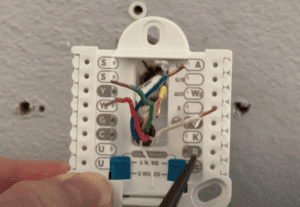
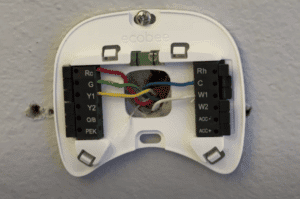
Step 7: Now you just need to match up the colors of all the wires with the colors stated on the base plate chart. The ones that are grey (highlighted) are the ones that are required.
- Connect Red with the one marked R.
- Green goes in the one marked G.
- Yellow goes in Y.
- White goes in W.
- Cyan (or Blue) goes in C
Amazon Thermostat Wiring Diagram
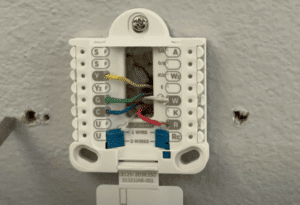
Now screw it up, in the same hole that was previously used for your old thermostat. You might need to drill more holes (optionally), to screw it up from the bottom as well.
It should look like this. Make sure that the wiring connections are strong and there are no loose connections, otherwise the Amazon smart thermostat won’t work.
Step 8: Now that all wires are in place, close the wire cover/lid, and take out Amazon smart thermostat faceplate from the box.
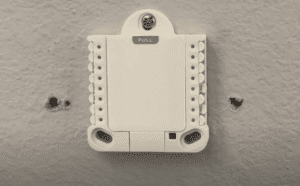
Step 9: Now, simply bring Amazon smart thermostat faceplate to the wall plate you just fixed and gently press it until you hear a ‘click’ sound.
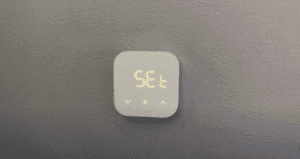
Step 10: All set! Now it’s time to turn your HVAC system’s primary power switch back on. As soon as you do so, the Amazon Smart thermostat display will show ‘SEt’ which means that the installation was successful!
How to set up Amazon Smart Thermostat on your phone using the Alexa app
Now that you have successfully installed the Amazon Smart thermostat in your home, the next step is to set it up using your Smartphone and connect it to Alexa (if you have one). Setting up the Amazon thermostat is done at the time of installation or after you have reset the thermostat.
How to set up Amazon Smart thermostat on your phone – A Step-by-Step Guide
Step 1: If you own an iPhone, download the Alexa app from the App store. If you own an Android phone, download it from the Google Play Store.
Step 2: Open the Alexa app and from the bottom right corner, tap on ‘More’.
Step 3: Tap on ‘Add a Device. This will show you a list of device types. Select ‘Thermostat’ from here.
Step 4: This will lead you to a list of Brand names. Select ‘Amazon’ from here.
Step 5: The Alexa app will now ask you whether your smart thermostat has been mounted on the wall. Tap on ‘Yes’.
Step 6: It will further ask you whether your smart thermostat display shows ‘SEt’. Tap on ‘Yes’ again.
Step 7: Now it’s time to connect your Amazon smart thermostat to the Alexa app. The Alexa app will now be prompting you to scan the QR code to connect.
Simply pick the blue/white colored paper that came with the packaging. There is a QR code on the back of it. Scan this QR code in the Alexa app.
Step 8: The app will perform some necessary processing and eventually connect your Amazon Smart thermostat to the Alexa app!
Step 9: For a better experience, Alexa will ask some further questions like the wires that you connected and the type of HVAC System/furnace you have.
Answer these questions and you are good to go!
Success! You now have full control of your Smart thermostat and your home’s temperature at your fingertips.
The good news is that if you have Alexa at your home, the Amazon Smart thermostat works with Alexa in a foolproof manner.
You can easily change your home’s temperature through voice control. This opens a new era of temperature monitoring and energy saving in your home!
FAQs – How to Install Amazon Smart Thermostat?
How does the Amazon thermostat get power?
The Amazon Smart thermostat gets its power from either the C-wire or through a power adapter kit.
You can use the Amazon compatibility checker mentioned above to check if it can be connected to your home’s HVAC system.
Why is my Amazon Smart Thermostat not working?
The first thing to check is whether t the thermostat is connected to your Wi-Fi or not. If it is connected and still not working, try restarting the Wi-Fi router.
If that doesn’t work, try disconnecting your thermostat from the Alexa app and setting it up again in the app. You can then reset the Amazon Smart thermostat using the Alexa app.
Why isn’t my Amazon smart thermostat displaying anything?
The most common cause of this is loose connections between the wires. Make sure all the thermostat wires we have discussed above are connected properly to the thermostat.
Summing it up
To sum it up, the Amazon smart thermostat is not so tricky to install. The entire process of installation and setup will take you no more than an hour.
I have explained the entire process of How to install Amazon Smart Thermostat in the simplest possible way. If you still face any issues while installing it, you can call on Amazon Home Services or call a technician.
I hope this article was beneficial in your Smart home journey!


2 thoughts on “How to Install Amazon Smart Thermostat – Simplest Guide (2023)”
Comments are closed.